Let’s Eat: Liège Waffles

This post has been a long time coming, but it’s finally here today! What could possibly be worth such a long wait you ask? Well…how about the recipe for authentic liège waffles a la our earlier trip (and blog post) to Belgium? That’s what I thought.

I’ve been wishing for these ever since I had them a few weeks ago, so without any further delay: Waffles!

IMG_1550

You’ll need:

  • 3 1/2 cups bread flour
  • 1 packet dry active yeast
  • 3/4 cup lukewarm (100-110 degrees F) milk
  • 8 oz softened butter
  • 2 eggs
  • 1/2 tsp salt
  • 1 generous tsp vanilla bean paste or regular vanilla extract
  • dash of cinnamon
  • 1 bag of belgian pearl sugar (available at amazon.com)


IMG_1534

I figured out why Belgian waffles are SO addictive and amazing…the drugs they put in the batter!

IMG_1543 IMG_1540A little of this stuff makes a HUGE different in all the baking I do…I cannot recommend it enough!

To make all these things turn into heavenly waffles:

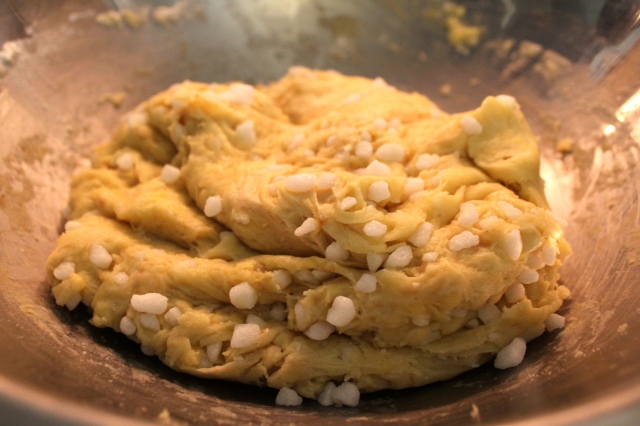
  1. Add your yeast to the milk with some sugar to let it proof. When it’s foamy and ready (about ten minutes), add all the other ingredients,except the sugar!!, and mix well.
  2. Let the dough rise for approximately 30 minutes, covered with a towel and set in a warm and cozy spot.
  3. Once the dough has risen, add an entire bag of pearl sugar…this is about to get realIMG_1546
  4. Make sure your waffle iron is heated, I set mine to level 4
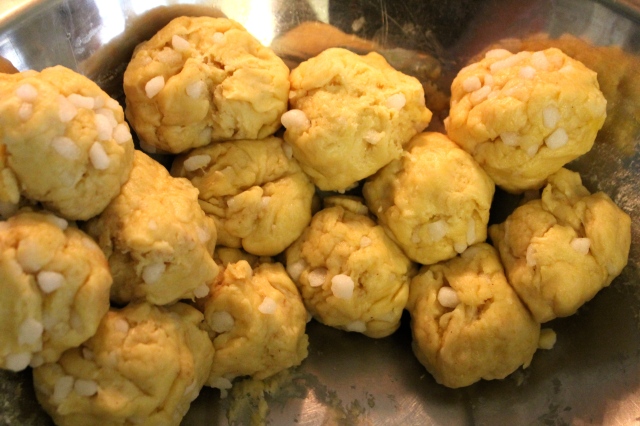
  5. Break the dough into roughly 3oz balls, and then pat them down before placing them in the waffle iron to cook. IMG_1551 IMG_1547
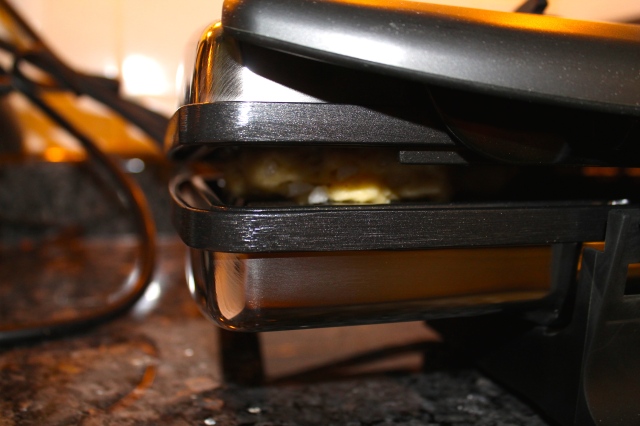
  6. They should be a nice brown color by the time you’re finished cooking (5+ minutes). Watch to make sure the sugar melts and crystallizes but does not burn!.
  7. Eat your face off and quote Shrek repeatedly. IMG_1553

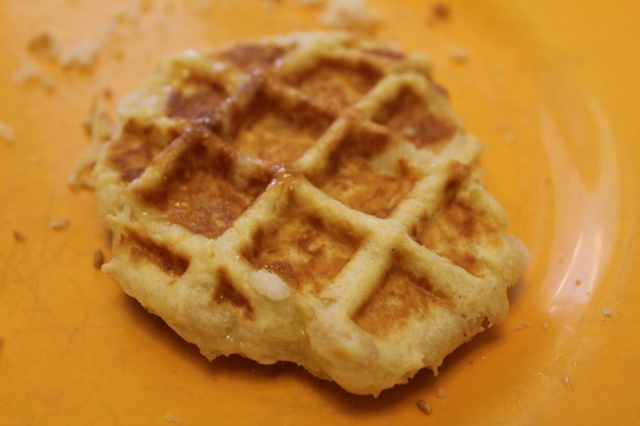
They are so delicious and way better than any other waffle I’ve ever tried…I can’t recommend them enough, if you have the energy! When you wish upon a waffle, dreams really do come true assuming you have crack sugar…I mean Belgian pearl sugar.

The extra dough can also be wrapped in plastic wrap and frozen until you have a craving at a later date…you never know when the waffle urge might strike!

Under 20 Series: Part I

Call it wishful thinking, but I thought it might be fun to post about things to get you out exploring when the weather turns friendly. Hopefully March goes out like a lamb, and we can all get out and enjoy warmer temperatures and sunshine!

Jordan and I both consider the Philadelphia area our state-side home base, so it’s with a lot of enthusiasm that I wanted to do a series on twenty things you can do in the area for under twenty dollars. First up is one of my favorite places in the city: Magpie.

Magpie: 1622 South St. Philadelphia, PA  19146.
Phone: 267-519-2904
Website: http://www.iluvmagpie.com

I will give you exactly one guess what Magpie is all about….

1922286_629629230424744_2003404272_n                  Photo credited to Magpie, link via picture.

If you guessed PIE you are correct! Fortunately for you, with twenty dollars in your pocket, the wealth of Magpie is essentially yours. You have options!

No piece of pie will cost you more than $10 for starters, which means you can pick from the seasonal menu offerings, both sweet and savory. And get yourself a cup of coffee or tea too!

To sweeten the deal, Magpie offers a special on Wednesdays, where $14 earns you a slice of savory pie, a slice of sweet pie, and a cup of coffee or tea.

1798561_617717594949241_497136408_n                  Photo credited to Magpie, link via picture.

With beauties like these, how could you possibly resist anyways?

1970415_627773120610355_33058205_n                  Magpie’s Banana Nilla Wafer Pie. Photo credited to Magpie, link via picture.

IMG_1414                  Magpie Blackout Pie: a chocolatey pudding pie that is scary good.

20140326-155517.jpg                  Lemon Gingersnap Pie from the winter menu

20140326-155312.jpg

My kryptonite: lemon curd pie with rosemary shortbread. About as perfect a bite of food as any person could ever hope to bestow upon their tastebuds.

20140326-155534.jpgPossibly my second favorite pie ever, the pear ginger crumb.

But what about breakfast?! While I think it’s perfectly reasonable to have pie for breakfast, during the weekend, you can also use that money in your pocket to put quiche in your mouth. Yup, you heard it here too. 20140326-155336.jpg

Magpie’s quiche-game is unparalleled. And the store is BYOB so you can make a truly festive brunch out of it!

Sadly, sometimes you can’t find the time to sit and really treasure your piece of pie with the attention it deserves. If you need your pie on-the-go, there’s a VERY appetizing solution: pie milkshakes.

Slice of pie + rich vanilla ice cream + blender = pie à la mode to go.

20140326-155231.jpg IMG_1413


Or you can stay in and eat it too. I thoroughly enjoyed the banana nilla wafer pie milkshake. Probably because I’m human with functioning tastebuds.

There is one more major offering to consider from Magpie, and while it does not fit into the realm of ‘under 20’ sometimes things are worth a little extra. In this case? How about a pie-making class with owner, mastermind, pie aficionado, and all around wonderful human Holly Ricciardi? That sounds good to you? Great! Grab a friend or loved one, and sign up for one of their monthly pie-making classes. Info is posted on their facebook page and website as classes are scheduled, and I promise you won’t be disappointed.

My mom and I went back in December and it was so, so, so much fun.

We made cranberry apple pies under Holly’s close supervision and learned a lot about pie, and baking in general. But mostly, we had a lot of fun.

20140326-155402.jpg

True story: you, as a pie-making class attendee, are fortunate enough to get the real-deal recipe for both the pie filling and the irresistibly good pie crust that separates Magpie pies from regular pie.

20140326-155425.jpg

Looking way too good to be made by me….

20140326-155441.jpg

Lattice work like a pro…because a pro was watching/guiding/encouraging
20140326-155502.jpgALL MINE.  You get to take your pie home with you, which just makes it even better because you get to share (or not) the goods with everyone.

So that officially concludes the inaugural post in the “under 20” series and I hope you’re motivated to try some pie. The shop is utterly adorable, the staff is wonderful, and Holly has a well-deserved reputation as the best pie-maker (and incredibly sweet and knowledgeable person!) in town. Now if you’ll excuse me, I really need some pie.


Let’s Eat: Extravagantly

I think a (large) morsel of food this extravagant deserves a story and sharing so without any distraction…IMG_1387

There once was a girl who wandered the vast world wide web, seeking answers to the question–what shall I make for our dinner party dessert? Cupcakes were a nice bite but awfully trite…cookies were too casual and brownies were old news, so a cake it had to be…

After searching and sighing in dismay, she came upon a wondrous cake…a truly magnificent looking beauty. “That’s the one!” Said she. A tuxedo cake done up in true black and white, looking strikingly handsome and truly remarkable. IMG_1388

Peering over to investigate the chosen one, her guy said “No! don’t do it! It’s too complicated looking–you’ll be stressed, everything will be a mess, it’s not worth it! Save yourself” (maybe I’m embellishing…)

“Nonsense!” She said, “It’s beautiful and glorious and a sure crowd pleaser, with time and patience it’ll go off without a hitch.” And so the recipe became reality and there was much planning, baking, frosting, ganache-ing, and then clapping when it was presented with much fuss and festivity…and then much eating and more groaning from the cake-eaters.

Here is the recipe that started this extravagant affair. However, I was not impressed with the chocolate cake recipe so I went to my go-to chocolate cake recipe and was much  happier with the results. Her recipe for the vanilla layers is easy and comes out very nicely though!

Instead of the raspberry white chocolate frosting (I associate white chocolate with crimes against humanity, if we’re being honest) I made the simplest vanilla buttercream recipe, which you can double or triple as your heart desires.

  • Beat 1 cup of soft, room-temperature butter until creamy and smooth.
  • Gradually add 3 cups confectioners sugar, until well incorporated.
  • Add 2 teaspoons vanilla extract or vanilla bean paste (my favorite!) and 1-2 tablespoons cream or milk to soften the mixture
  • When smooth and well mixed, slap it on your cake (or pipe it) with a butter knife or frosting knife.

Tips for Tuxedo Cake:

  • Plan–I made the cakes a day in advance so I could freeze them overnight (wrapped in plastic wrap, in a gallon zip-loc bag)
  • Let the chocolate cakes barely  thaw 5-6 minutes before slicing them in half horizontally, they get harder to work with faster.
  • I froze the cake inbetween doing the first four layers (frosting filling, raspberry filling alternating) and the last four, just to keep everything nice and chilly. I also was very deliberate about freezing it after the crumb coat, the first frosting coat, and after the final one that I smoothed out. I think it helps make the cake more stable as you manipulate it.
  • As always, be very careful when making ganache because it’s liable to break (as the recipe creator noted from her own experience). I find that being exceedingly gentle as you mix, waiting 3-4 minutes for the hot cream to melt the chocolate, and working to make sure very little air gets incorporated, is a sure way to keep your ganache smooth.

20140313-132242.jpg20140313-132253.jpg

Her recipe gets slightly confusing when talking about slicing the cake when cold but serving at room temperature. I found that we had no trouble at all slicing the cake at room temperature right before serving. I poured the ganache over the cake about 6 hours before we served and there was no trouble at all! Plus, we don’t even have a cake stand or serving knife here so you know it can’t be that hard.

20140313-132313.jpg

20140313-132302.jpg

This cake was an absolute crowd pleaser– there was a chorous of delighted eating commentary and praise. If an occasion arises where you want to make a real show stopper, you can never go wrong with a classic tux! It’s almost too pretty to eat…almost.

So in conclusion, they lived happily ever after with full tummies and sugar rushes. The end!

IMG_1391

Let’s Eat: Easier than Pie Dessert

I love baking–truly. It’s delicious, always well received, and fun. It can also be a royal pain because it requires a greater level of precision than cooking. No dashes or guesstimated measurements, just patience and attention to detail. But sometimes I want a dessert that comes together in say, minutes. With no fuss. And still tastes good. Demanding I know, but I discovered the answer a while ago: crisps!

Berry crisps, apple crisps, pear crisps, hodgepodge of fruit crisps-done, done, done, and done. and easier than pie (seriously).

Crisps are all the goodness of a fruit pie or cobbler, with a lot less work, and less bad-for-you calories. You can use frozen fruit from your grocer, or apples and/or pears you might have lying around that need to get used, anything really. For this recipe, I’m using two bags of frozen fruit I grabbed at the commissary, but it’s easy to substitute! All you need to do is…

  • Get enough frozen berries/fruit to fill your desired pan…mine was a pretty standard 9in square. I got one bag of frozen berries, and one of dark, sweet de-pitted cherries.
  • Place enough fruit filling in the baking dish so that it’s nearly full.
  • Add 1/2-3/4 cup sugar, the juice of one lemon (or orange), and some zest if you’re feeling fancy. Toss the berries, sugar, and lemon juice around until everything is nice and coated. **if you want to make your crisp’s filling less runny, mix 2-3 tablespoons of instant clear gel (easy to get on Amazon.com) in with the sugar before you add it to the berries! Use less cleargel for less watery fillings, like apples**

That’s it for the filling…next you’ll need a sufficiently crispy topping for your crisp….

  • Mix 1 generous cup of oats with a sprinkling of cinnamon (your call), 3/4 cup flour, some brown sugar (again, as much or as little as you’d like), and 1/2 cup very cold butter cut into smallish pieces. Mix this until the butter is fairly well incorporated, and the flour/oats are mixed.

Very gently and with a lot of flair so as to impress everyone, dump the topping onto the filling until covered. Now bake at 350 degrees for about 40+minutes, or until the filling is bubbling up around the topping. Remove from the oven and let cool for a few minutes before serving. Epic on its own, and dreamy with ice cream. It’s even better the next day, straight from the fridge for breakfast with some plain greek yogurt.

Obviously you’ll need more topping if you’re making a bigger pan (more for breakfast!!) so just double it as your needs dictate. You can always freeze the extra topping for next time.

Other delicious fillings could be apples with extra cinnamon, some honey, a little orange zest and cranberries…orrrr pears, orrrr peaches…the possibilities are endless, and delicious. Sometimes I add slivered almonds to my topping, or a little granola if I have some good stuff on hand. It is entirely up to you–you can’t ruin a crisp, I promise!

20140221-132528.jpg

Next time your sweet tooth gets a little needy, but you don’t  have the time or energy to create something special, just make a crisp with what’s on hand. You, and anyone else you’re feeding if you’re kind enough to share, won’t be disappointed.

Get Better Baking

One of our friends is spending the week in the hospital, so it seems like a good time to drop off some well wishes and treats! I made two desserts that we’ll package up and deliver later today. The first, from Averie Cooksis an easy crowd pleaser: Red Velvet Chocolate Swirled-Brownie Bars. Her recipe is incredibly simple and the results are amazing.

IMG_1338 IMG_1343 IMG_1351

I also made snickerdoodle cupcakes because…why not. These babies from Sally’s Baking Addiction are another easy to whip up delight.

IMG_1363 IMG_1370

I think a sugar-rush is just the pick me up our friend needs! Of course, if you find yourself in a mid-week slump, then maybe the brownie/cupcake prescription will work wonders for you too.